Tuesday, November 22, 2011

DIY Bedside Table

I completed another project just in time to move into a new (smaller) apartment.  More on the new apartment to come later.  Until then, here's the step-by-step DIY process for transforming a plain IKEA chest of drawers into an interesting and cute bedside table.  In full disclosure, I borrowed this idea from my friend Erin's blog and she, in turn, borrowed it from Lindsay's blog.

You start with the Rast bedside table from IKEA:
Then you assemble the pieces. Here is the assembly line in my former kitchen:


I painted the drawers with semi-gloss white paint.  My mom was in town for this step of the process.  She recommended using a foam roller (and actually did most of the painting).  A foam roller is definitely the way to go.  It is much faster and has a better/smoother finish than using a traditional paint brush.


After a disastrous attempt to stain the outside of the chests a light gray color, I decided to paint them gray instead.


Here is one of the chests before I added the finishing touches:


Last step is to add the knobs, which were ordered from the store Lindsay used in her blog:


Viola!  New (custom) bedside tables for less than $50 each.

Tuesday, October 25, 2011

New Living Room Rug

I made a big purchase the other day when I ordered a rug from Dwell Studio. The duvet cover in my bedroom is from Dwell, and I've had my eye on this rug for awhile. I was cautious before making a purchase since 1) I didn't want to spend a lot of money (and rugs can be quite expensive) and 2) I wanted something that I would be likely to use when the time comes to move out of my apartment and into a house.

So (drum roll, please!) here it is:


The "bird" pillow on the sofa is also new. It is the same pattern as the duvet cover, and hopefully, brings the two rooms together.

I have a few more exciting furniture purchases and DIY projects up my sleeve, so be on the lookout for more posts! I promise not to take so long this time....

Monday, July 18, 2011

Poor Man's Meal

When I was living in NYC, I spent a lot of time worrying about money.  Everything was just so expensive--especially food and drinks at restaurants.  I didn't want to miss out on trying all the great food the city's restaurants have to offer, so I did my best to save as much money during the week so that I could spend it going out to dinner on the weekends.

Enter "the poor man's meal" or homemade black beans and rice.  I got this recipe from my sister.  It's very easy to make and provides approximately 12 portions or meals for one for a few weeks.

You start by chopping carrots, celery, half an onion and a few cloves of garlic.  I would include amounts, but this recipe is not very precise.  I think I usually use 3 carrots and 3-4 celery stalks.  Heat up some olive oil in a pot and saute everything together.  It should look like this:


I use whole black beans that you buy in the bag, because it's less expensive than canned beans and you don't have to worry about preservatives and other bad things that may be involved during the canning process.  You have to soak the beans in water overnight before you drain them and add them to the pot.


The next step is to add chicken stock.  I typically add an entire box.  You just need to make sure the stock covers the beans.


Bring the mixture to a boil and add seasoning.  I use cumin, paprika, cayenne pepper, Tabasco, salt and pepper.  Again no exact measurements.  Just add everything to taste.


Mix everything together, reduce heat, cover and let everything simmer for an hour or so.  Your finished product should look like this:


I serve my black beans with brown rice and salsa.  Enjoy!

Thursday, July 7, 2011

Father's Day Paella

I realize it's been over a month since my last blog post.  Oops!  I guess things got a little busy.  I just got back from a family vacation to Park City, Utah--it was amazing--and will be sure to post pictures from that trip soon, but I thought I'd write a little something about our Father's Day adventures with paella.

I really can't take too much credit for this--actually, I can't take any credit, except for taking the pictures.  My sister Erin, the chef, and my stepmom Barbara concocted this whole plan to build a fire pit in our backward and make homemade paella.  They were inspired by the Canal House cookbooks and even utilized the same recipe, which you can find in Volume 1.  Here are a few pictures of the prep and cooking:

Erin standing next to the fire pit.
Chicken breasts are cooked first.
Chicken breasts are removed then tomatoes and other goodies are cooked.
Chicken is added back into the mix.
The final product, ready to eat!

Friday, May 20, 2011

Gorgeous Kitchen!

Remember my post about all the blogs I follow?  Well, I was a little bored the other day so I spent some time searching Urban Grace for fun DIY projects and before-and-afters and I came across the most beautiful DIY, before-and-after kitchen remodel ever!  Here are the before pictures:


And here are the after pictures:


You might be thinking to yourself, "how is this a DIY project?"  The transformation is incredible, isn't it?  But check out this transition photo.  It shows you what they did.  Rather than spend lots of money to replace the spec cabinets--my stepmom and I had a LONG discussion last night about the horror of spec cabinetry (it's a crime people and someone should be doing time)--they simply moved them higher, added crown modeling, painted them and replaced the hardware.  Same thing for the bottom cabinets--a coat of paint (I love how she chose different colors for the upper and lower cabinets) and some new hardware and they are unrecognizable.


Now, I'm sure she paid someone to replace the tile with wood floor--check out that laminate flooring that was probably hiding under the tile!--and maybe even someone to do the subway tile back splash, but the back splash, at least, is something you could learn to do yourself.  Pretty impressive!

Thursday, May 19, 2011

DIY Dresser Project

It takes a lot, and I mean a LOT, of money to furnish an apartment, so when it came time to purchase a dresser for my bedroom, I took the cheap road straight to IKEA. I had done some searching online and found the HEMNES 6-drawer dresser in gray-brown.  At $279, the price was right!

But, let's be honest--those dresser pulls leave a little to be desired.  So I did what any creative gal would do and I went to Anthropologie.  They have an amazing assortment of interesting hardware that won't break the bank.  I purchased several options, took them home to test them out and eventually settled on the clear Cabinet Carat Knob.


The knobs are $6 each.  I needed 12, which brings the total cost of the dresser to $351.  Here's a look at the final product (sorry for the poor quality picture, but I'm a better blogger when I can just email photos from my iPhone to myself):

Wednesday, May 18, 2011

Tortilla Soup

I know it may come as a huge surprise to some of you, but I've been doing a lot of cooking lately.  I surprise myself because I actually enjoy doing it.  Last night I made tortilla soup for the first time and I have to compliment myself because it was delicious!


 Ingredients:
  • 10 corn tortillas
  • 1 zucchini, chopped
  • 1 yellow squash, chopped
  • 1 large onion, chopped
  • 3 large carrots, chopped
  • 3 celery stalks, chopped
  • 6 garlic cloves, chopped
  • olive oil
  • 8 cups chicken broth
  • 2 (15-ounce) cans chopped tomatoes, drained (I used Rotel for flavor.)
  • 1 can corn kernels, drained
  • 2 teaspoons ground cumin
  • 2 teaspoons chili powder
  • Pinch cayenne pepper
  • Chopped fresh cilantro
  • 1 jalapeno, seeds removed and chopped
  • 1 1/2 cups cooked shredded chicken (I bought a rotisserie chicken that was already cooked.)
Step 1: Saute zucchini, yellow squash, onion, carrots, celery and garlic in olive oil until cooked (about 5-10 minutes)
Step 2: Add the chicken broth, tomatoes, corn, cumin, chili powder, cayenne, jalapeno and cilantro.  Bring to a boil and simmer for 30-45 minutes.
Step 3: Add chicken and simmer for an additional 10 minutes.

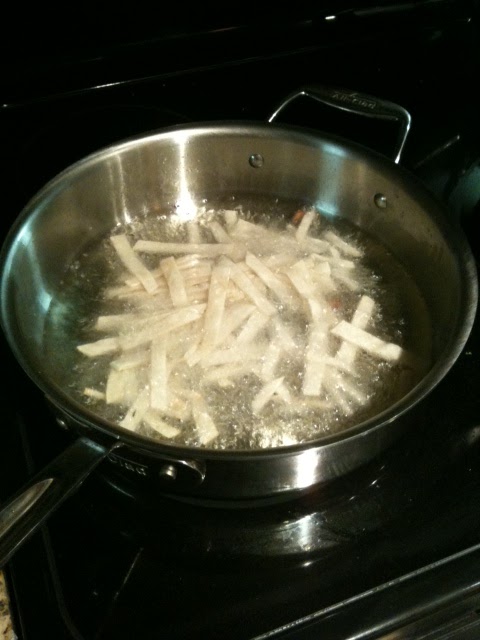
I fried my own tortilla strips to use as a garnish.
Step 1: Heat canola oil in a pan on the stove top.
Step 2: Slice tortillas into strips.
Step 3: Toss strips into hot oil, turning until golden brown.


Your final product should look something like this:


I had lots of leftover tortillas so I made chips as well.  Just cut the tortillas into wedges instead of slices.


And fry just like you fried the tortilla strips.  These are excellent with homemade guacamole!


Here's a look at the final product.  In addition to the tortilla strips, I garnished with cilantro, shredded cheese and an avocado slice.  Bon appetit!